Migrating vCenter server VM.

I needed to migrate a vCenter server that I had installed as a VM in a vSphere 5.0 environment. I wanted to get it moved to a different datastore. I had all the ESXi servers under the vCenter control. I needed to migrate it like this to get it to high availability (HA) storage. This is what I did to move it. The key was the first step. I am sure there are several other ways migrate the vCenter VM, especially if your datastores are already on HA storage.

From the vSphere client logged into your vCenter server, disconnect the ESXi host that your vCenter server is running on, as well as the one you want to migrate it to.

This next step could be done before or after disconnecting the hosts from vCenter:
Login to the vCenter server and install the VMware Converter.

Launch the converter and set up a job to migrate the vCenter VM to the new host location. I needed to migrate to new host, because that is where my HA storage was located.

Once the converter is completed, I shut down the old vCenter server, and started up the server in the new location.

The network did not migrate properly for me. I don’t know if this is something I missed or just the way the converter works, but I needed re-configure the IP address. That was not preserved in the migration. Perhaps, because of the change in the MAC address. Once the IP address is changed, you can either reboot the vCenter server or re-register the name with updated IP address. For me, the DNS record was updated, because the converted vCenter server picked up a DHCP address instead of the static I had assigned the server before the migration.

After I got the IP/DNS issue resolved, I connected to the vCenter server via the vSphere client like I did before the migration. Then, I just neeed to re-connect the ESXi hosts and everything was back up and ready to go.

Note: No other guests needed to be shutdown during this process.

Windows 2008 R2 to Windows 2003 trust relationship

More old notes:

These are the steps I used to create a one way trust between a Windows 2008 R2 server domain and a Windows 2003 server domain. The object was to give the Windows 2008 domain environment (DomainA.com) access to the Windows 2003 domain environment (DomainB.com), but DomainB.com would have no access to the DomainA.com domain. This process can be very confusing and difficult to keep straight in your head, but I am certain that these steps worked in the environments I described above.

Windows 2008 –> Windows 2003.
From DomainA.com (Windows 2008):
Bring up “Active Directory Domains and Trusts”
Right mouse click on DomainB.com and go to Properties.
Click on the Trusts tab.
Click “New Trust”
Next
Trust Name: DomainB.com
Forest trust
One-way: incoming
This domain only
Trust Password
Next
Next
No,do not confirm the incoming trust.

From DomainB.com (Windows 2003):
Bring up “Active Directory Domains and Trusts”
Right mouse click on DomainB.com and go to Properties.
Click on the Trusts tab.
New Trust
Next
Trust Type: Forest trust
One-way: outgoing
Sides of Trust: This domain only
Forest-wide authentication
Trust Password
Next
NExt
Confirm Outgoing Trust: Yes, confirm the outgoing trust.

Then, to grant authentication permission:
From the Active Directory Users and Computers on the DomainB.com server:
Click View and Advanced Features.
Right click on Domain Controllers and go to Properties.
Then click on the Security tab.
Click Add…
Click Locations…
Select the DomainA.com from the list and click Ok.
Then enter under “Enter the object names to select” the user/group that you want to grant access to DomainB.com from a DomainA.com account. In my case, I just chose Domain Users.
From here I am prompted for DomainA.com credentials which I enter. This can be an issue that I need figure out, because what if I have no credentials in DomainA.com? It does seems that I shouldn’t need any in this configuration. In my case, this allowed a DomainA.com login the capability to login to DomainB.com computer and access resources on DomainA.com and DomainB.com as permitted. However, because it is a one way trust, DomainB.com cannot access resources on DomainA.com.

Adding secondary domain controller to Windows 2008 Domain

I am getting caught up on some old notes I had not finished up. The following is the procedure I used to add a second domain controller and DNS to an existing domain with one domain controller and one DNS. This environment was all Windows 2008. I am not sure whether it was R2 or not, but I the procedure should be very similar for either version.

From the newly created member server:

Go to “Server Manager” and click on “Roles.”

Click on “Add Roles.”

Select “Active Directory Domain Services.” This will install the domain services. Since this is a second domain controller being added, you will not be asked to install a DNS server like you would if it was the first domain controller in the domain.

Once completed, you need to run dcpromo.exe to make your server an active server as an active domain controller in your domain. I chose to “Use advanced mode installation.”

You will need to choose your deployment configuration (Existing forest or new domain in a new forest). Click “Existing forest” and “Add a domain controller to an existing domain.”

Enter the name of the domain. Note: this will already be populated correctly, if you had previously joined the domain as a server.

Under “Alternate credentials”, click “Set…” and enter Administrator level account credentials for the domain and click “Next.”

Under “Additional Domain Controller Options”, I unchecked “Global catalog” but left “DNS server” checked because I wanted to add another DNS to the domain. I did not want a “Read-only domain controller (RODC).”

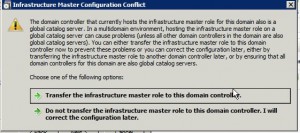
If you receive the following message, you need to choose appropriately. I decided to “Transfer the infrastructure master role to this domain controller.”

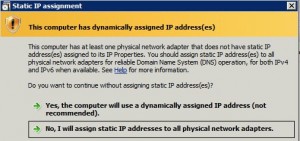
For some reason, I got the following message regarding my IP address assignment. I only had one NIC, and while the interface was using DHCP, I configured the interface with a static address before I started this process.

I decided to chose “No, I will assign static IP addresses to all physical adapters.” This took me backup to dcpromo wizard, which I promptly canceled to check my configuration.

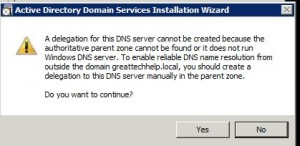
I verified my IP address configuration and rebooted. The same thing happened. I went on with dynamic option, then got an message regarding DNS delegation.

It turns out that I had couple issues to deal with. I needed to disable IPv6, and I had a reference to an old secondary DNS. I removed old secondary by right mouse clicking on the domain name in “DNS Manager” on the primary DNS, and going to properties. From here, I chose “Name Servers” and removed the old DNS.

Migrate ADS From Windows 2008 to Windows 2008 R2.

I started this awhile ago and I just want to get the information posted for my reference. I had a Windows 2008 x32 (DCOLD) server acting as my primary domain controller and DNS. I wanted to introduce a new Windows 2008 R2 x64 server and promote it to take over all the roles of DCOLD.

Windows 2008 DC (DCOLD)

Install Windows 2008 R2 x64 (DCNEW).
Ensure that network settings are configured to support DCOLD (Use DCOLD as DNS, make sure network domain name is set to DCOLD domain name).
Join DCOLD domain as a member server.

DCOLD (Windows 2008 32bit):
Copy the support\adprep directory from the installation source iso.
Run adprep.exe /forestprep

This did not work because I initially copied adprep from the 32bit source.
I got the following message”

Forest-wide information has already been updated.
[Status/Consequence]
Adprep did not attempt to rerun this operation.

Solution (You need to use adprep from the 64bit installation source.):
I had to copy the support/adprep directory from the Windows 2008 R2 CD, and run the following

adprep32.exe /forestprep

Install Windows 2008R2
Configure name/network, and bring into domain.
Run dcpromo.

Transfer roles 5 roles to DCNEW:

Schema Master
RID Master
Domain Naming Master
Infrastructure Role
PDC Emulator

This is a very basic outline, and there are several clean up steps that need to occur after this if I wanted to demote and remove DCOLD.

Restore MS SQL database from filesystem backup.

I found myself having to restore a Microsoft SQL 2000 database using only a file system backup. I was very cautious about my approach, because I wanted to restore the database to a database with a different name. I did this by using “Attach database …” from Enterprise Manager.

Right mouse click on “Databases”.
Go to “All Tasks”
Then, “Attach Database…”
Browse to MDF file that you restored (MDF and LDF should be restored from file system backup), by clicking the “…” next to the “Verify” button.
Then, database name you want to use for the restored database in the “Attach as” field.
Then, choose the database owner in the “Specify database owner” drop down.

It worked great, and was simple. Of course, I know that I should be doing the restores from a SQL backup, but circumstances came up where that was the only backup I had to work from. I will probably verify this procedure on a more current version of SQL server and update accordingly.

I decided to go from one extreme to the other. I installed SQL Server 2012 RCO to try to restore a database from a file system backup. It is a little different, but basically the same steps.

Right mouse click on “Databases” and click “Attach…”
Click the “Add…” button and add the mdf file you restored.
Then double click the name under the “Attach As” column heading to restore to a database with a different name.
Click “Ok” to finish.

mount -t cifs for Redhat/CentOS 6.x

mount.cifs has been moved from the samba-client package, for recent Redhat variants, to cifs-utils. I have been stung by this a couple times, so I figured I would note it here.

CentOS 6.0 Continuous Release repository issues.

I noticed that some of my servers were running a different kernel version even after I ran yum update. I thought maybe I had not installed the centos-release-cr-6-0 rpm on all of them, but I did. I just needed to clean out the yum cache using the following:

yum clean all

Format FAT32 in linux.

I have found this very helpful when dealing with external drives to use in linux, MacOS or Windows:

mkfs.vfat -F32 /dev/sde1

Samsung Galaxy Tab rooted and Gingerbread Installation

This is the procedure I used to root my T-Mobile Samsung Galaxy Tab 7 (with no SD card installed and USB debugging enabled) and install the Overcome Gingerbread ROM. The computer I used is a Macbook Pro running Windows 7 64bit in VMware Fusion 3.1.3.

First, a little background. Why did I wait so long and what finally brought me to do this? I waited so long, because I am under a two year contract, and I wanted to give Samsung and T-Mobile the opportunity to do good by use early adopters of the Android tablet ecosystem. I was encouraged when I heard that the other carriers were getting the Gingerbread update. I really wanted to run Gingerbread on the device, because it was clear pretty early on that some fixes were needed. Several months later and basically a no response kind of response from Samsung on several occasions did not give me much hope. I decided I would give it a year which would have been in January. Well, Google Music release came along and pushed toward updating sooner. I had used the beta on my Froyo Galaxy Tab for a while. While not impressed, it did work. I uploaded music and could stream on multiple devices. However, when Google released Google Muisc and introduced the music store, I found it completely unusable. Everything, I looked at seemed to indicate that is should work in Froyo, but did not work much more often than it did. What led me to Gingerbread, was when I tried to access Google Music via my Dolphin web browser. I got a message stating that the version of my device was not supported. I thought this was pretty funny, because the web site works surprisingly well on IOS. I checked out Google Music on a Samsung Vibrant running Gingerbread and it seemed to work ok (a little slow, but I could see everything I bought and uploaded). So, I decided to jump in and give a go. So far, I am pleased with the smoothness and what seems to be a little speed boost (especially in K9-Mail and browsing the web using the Dolphin HD browser). Also, I am pleased with the performance of Google Music on Gingerbread. It works much better than on the Vibrant. So far, I have had only on “Force quit” come up (K9-Mail). We will see how it goes, but so far it looks like an improvement.

Computer OS: Windows 7 64bit
Android Device: Samsung Galaxy Tab 7 T-Mobile version running Froyo (Android 2.2)
Gingerbread ROM: Overcome Series 7 Version 4.0.0

From Windows 7:
Ensure the you have at least Framework 2.0 installed. I had Microsoft .Net Framework 4.0 installed.

From Windows 7:
Make sure you have the drivers for your Galaxy Tab installed and working properly. I have my Windows installation configured to use Windows Update to locate and install the correct drivers, if they cannot be found on the system already. This worked well for me.

From Windows 7:
Root using SuperOneClick:
Download the zip file from http://shortfuse.org.
Unzip the file on your computer.

From Windows 7:
Execute the SuperOneClick.exe as administrator ( right mouse click and Run as administrator).
If successful, you should end up with SuperUser icon in your Applications.

From Galaxy Tab:
Download and install “Titanium Backup root” from the Market.

From Galaxy Tab:
Once rooted, patch the boot loader by downloading and running the app file on your Froyo based Tab only. I downloaded it from here: http://forum.xda-developers.com/showthread.php?t=888071

Connect your Galaxy Tab to your computer (make sure the drivers are installed and loading successfully) and turn on mass storage (I did this by pulling down the notification on the Galaxy Tab, and clicking on the USB notification and turning on USB Storage.). Navigate to your device drive via Computer in Windows, and create a TitaniumBackup directory on the root of the drive.

From Galaxy Tab:
Launch Titanium Backup and backup up all you data and applications by choosing user data and apps from the the batch option. Backup to the TitaniumBackup directory on your device.

Connect your device to your device to your computer and turn on mass storage.

From Windows 7:
Copy the TitaniumBackup directory on your Galaxy Tab to your computer.

From Windows 7:
Download the following three files from the TeamOvercome website:
001001-GB-stock-safe_v5.zip
002001-Overcome_Kernel_v4.0.0.tar
001002-Overcome_7_Series_v4.0.0_Wipe.zip

From Windows 7:
Unzip 001001-GB-stock-safe_v5.zip on your computer.

From Galaxy Tab:
Put your tab in download mode.
Turn it off.
Press the Volume Down button and the Power button at the same time.
Hold them until you see the “Downloading… Do not turn off Target!!!” message displayed on the Tab.

From Windows 7:
Go to the folder where you unzipped the 001001-GB-stock-safe_v5.zip file.
Navigate to the Odin3_v1.7 directory and launch the ODIN executable by right mouse clicking on it and selecting Run as administrator.

From Windows 7:
At this point, you can tell that everything is fine, if you have a yellow shaded box under ID:COM with something like 0:[COM4] in it. If not, it is either an issue with the drivers or you did not execute ODIN as administrator (The mistake I made the first time, I tried this.).

From Windows 7:
Click PIT button and choose gt-p1000_mr.pit from the files you extracted earlier.

From Windows 7:
Click the PDA button and choose the GB_Stock_Safe_v5.tar file.

From Windows 7:
Click the Phone button, and navigate to the T-Mobile Modem directory and choose the modem.bin file (note; this is only for T-Mobile tabs. Other tabs will use different modem files. See the TeamOvercome site for those.).

From Windows 7:
Click Start. This will go through the process of installing the Samsung JQ1 ROM. Let it go without interrupting.

From Galaxy Tab:
In my case, the ROM installed but then just sat in the Reboot menu. I had to hit the power button to have the device reboot.

From Galaxy Tab:
Once the device is back up, you are presented with a setup wizard. I selected English (it came up in Italian), and just clicked next or cancel through the wizard.

From Galaxy Tab:
Next you need to turn on mass storage and connect your tab to your computer so that you can copy the following file to your Galaxy Tab to the root of your device:
001002-Overcome_7_Series_v4.0.0_Wipe.zip

From Galaxy Tab:
Once the file is copied to the root of your mounted device drive , power down your device and put it in download mode again.
Turn it off.
Press the Volume Down button and the Power button at the same time.
Hold them until you see the “Downloading… Do not turn off Target!!!” message displayed on the Tab.

From Windows 7:
Fire up the ODIN utility again, and click the PDA button.
Select the Overcome_Kernel_v4.0.0.tar file you downloaded earlier.
Click Start. Your Galaxy Tab should reboot automatically. Mine rebooted fine (no reboot menu like previously).

From Galaxy Tab:
Once up, we need to go into Recovery mode.
Power down the tab.
Hold the Volume Up bottom and the Power until you see the Galaxy Tab on the screen.
You will know you are in recovery mode, when a menu display comes up in the upper left corner of display.

From Galaxy Tab:
Once in the recovery mode, navigate to the “install menu” using the volume rocker and hit the Power to enter the install menu.

From Galaxy Tab:
Navigate to “choose zip from internal sdcard” and hit the power button to select the zip file you copied to your device earlier.

From Galaxy Tab:
If you copied the 001002-Overcome_7_Series_v4.0.0_Wipe.zip to the root of your internal storage as outlined earlier, you will see the file listed.
Navigate to it and select it by hitting the power button.
To confirm you need to hit the power button again. This will install the Overcome ROM. You will get a message welcoming you to the Overcome Experience.

From Galaxy Tab:
Once done navigate to Go Back option and hit the power button.

From Galaxy Tab:
Then select the reboot menu and hit the power button.

From Galaxy Tab:
Then select reboot the system and hit the power button. This will reboot the Galaxy Tab with the Overcome ROM.

From Galaxy Tab:
Once the Galaxy Tab is up, you need to run through the setup wizard again (I think this was initially in German this time.).

From Galaxy Tab:
Once through the wizard, turn on mass storage, and copy your TitaniumBackup directory to your Galaxy Tab.

From Galaxy Tab:
Go to the Android market and install “Titanium Backup root”.

From Galaxy Tab:
Launch Titanium Backup, and restore your applications and data. This worked great for all my applications, except voice application (Voice Synthesis?) that was recently added to Google Maps.
Install iPad baseband 06.15.00 on iPhone3Gs to unlock.

The following was done from MacOS 10.7 Lion.

Because I did not use my iPhone 3Gs for a while, I missed getting my IOS 4.3.3 shsh blob saved, so I was only able to use this procedure for IOS 4.1. I used the following procedure upgrade the baseband to iPad version 06.15.00, since I mistakenly updated the baseband to 05.16.01 previously. With this baseband installed I was able to use Ultrasn0w to unlock the phone.

Software used:
Redsn0w 0.9.6RC16: redsn0w_mac_0.9.6rc16.zip
iTunes 10.2 or later
IOS 4.1: iPhone2,1_4.1_8B117_Restore.ipsw

Unzip Redsn0w and launch redsn0w from the redsn0w_mac_0.9.6rc16 directory.

Browse to the IOS restore distribution, in my case, iPhone2,1_4.1_8B117_Restore.ipsw.

Next you are asked to choose whether your iPhone 3Gs is an older or newer model. I had a
3Gs I bought within the first week of release, so I chose “No.”.

After patching the IOS package, you are prompted to choose your options. Only select “Install Cydia” and “Install iPad baseband.”

Next you are warned, because this pretty much a point of no return installation, so make sure you understand the consequences. I needed to unlock the phone to use on the T-mobile network.

Connect your phone via the USB cable.

Now you need to put the phone in DFU mode. I find the following easier than following the on screen prompts:

With device powered on and unlocked:
Hold the Power and Home buttons.
When the screen goes black, count to 2.
Then, release the Power button, and hold the Home button for 10 – 15 seconds.
You know you are in DFU mode, if the screen stays black.

Once in DFU mode, click through the next prompt. Then, redsn0w will update the baseband and install IOS. Once complete and the phone restarts, go to General/Settings/About and verify that the baseband is updated to 06.15.00. Also, verify that you have the Cydia icon installed.

Install Ultrasn0w 1.2.3 from Cydia by adding the following repository under Manage/Sources:

http://repo666.ultrasnow.com

Once the repository has been added, type in ultrasn0w in the search field and install Ultrasn0w.

Reboot the phone when prompted, and you should be set with an unlocked iPhone 3Gs.

Now for the issues that I have with this installation:

Because I had to install IOS 4.1, I lost MMS capability with this installation. Also, since Find My iPhone was not free until ISO 4.2, I am unable to use the service. I cannot get the device recognized to register it to use the service.

I realize that I could upgrade the IOS to a newer version, but from what I have been able to tell any update would have to be tethered at this point, which would not really be practical for me now.

Return top

INFORMATION