Archive for the ‘Documentation’ Category

How to enable compression in an apache web server.

This worked great for me for all of my websites. I did this globally by adding the following in my /etc/http/conf/httpd.conf file. I had no other Location options enabled. I could do this by VirtualHost, buy opted not to for now, since I have very little upload bandwidth.

I took this, as is, from http://httpd.apache.org/docs/2.0/mod/mod_deflate.html.


# Insert filter
SetOutputFilter DEFLATE

# Netscape 4.x has some problems…
BrowserMatch ^Mozilla/4 gzip-only-text/html

# Netscape 4.06-4.08 have some more problems
BrowserMatch ^Mozilla/4\.0[678] no-gzip

# MSIE masquerades as Netscape, but it is fine
# BrowserMatch \bMSIE !no-gzip !gzip-only-text/html

# NOTE: Due to a bug in mod_setenvif up to Apache 2.0.48
# the above regex won’t work. You can use the following
# workaround to get the desired effect:
BrowserMatch \bMSI[E] !no-gzip !gzip-only-text/html

# Don’t compress images
SetEnvIfNoCase Request_URI \
\.(?:gif|jpe?g|png)$ no-gzip dont-vary

# Make sure proxies don’t deliver the wrong content
Header append Vary User-Agent env=!dont-vary

Wordbook plugin.

I am trying to get the wordbook plugin to post on my facebook wall.

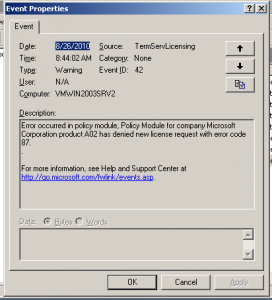
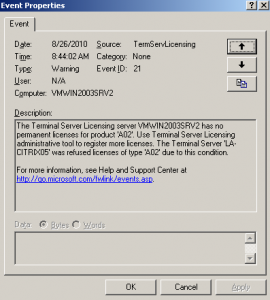
Event ID 21 and 42 – Terminal Server license errors.

If a Windows Terminal server client receives the following kind, they need to remove the corrupt license registry key on the client. The following two messages were identified on a Citrix license server.

The solution was to remove the following registry key:

HKEY_LOCAL_MACHINE\SOFTWARE\Microsoft\MSLicensing

The key will be recreated the next time the client connects to the Citrix server.

How to increase shmmax kernel parameter in linux.

Used the following to modify the shmmax kernel parameter in Fedora 13 after updating postgresql on a machine running WiKID for two-factor authentication.

Modifies the parameter:
# sysctl -w kernel.shmmax=67108864
Changes the parameter so a reboot is not required.
# sysctl -p /etc/sysctl.conf

To keep the new setting after rebooting:
# vi /etc/sysctl.conf

kernel.shmmax=67108864

Hex editor – vi?

Open the file as your normally would ( For example, vi mybinary.fil):
To view in hex:
Enter the following from command mode: :%!xxd

To switch back:
Enter the following from command mode: :%!xxd -r

If you are making changes you want to save, make sure you switch back before saving the file. Otherwise, you end up saving the file as the text you see when viewing the file in hex mode.

Create a custom SMS/MMS tone on an iPhone.

To create a custom SMS tone for a jailbroken iPhone on MacOS from iTunes:

1.) Start iTunes.
2.) Go to Preferences/General.
3.) Click “Import Settings” next to “Ask To Import CD.”
4.) Change “Import Using” from “Mp3 Encoder” or other to “Aiff Encoder.”
5.) Right click on the song you want to convert and go to “Get Info.”
6.) Click on the Options tab and go to “Start Time” and “Stop Time.”
7.) Enter the desired time range that you want and click “Ok.”. It should be less than 30 seconds in duration.
8.) Right click the clip and click “Create AIFF Version.”
9.) Rename the resulting .aif file to sms-received[1-6].cap.
For example: Rename myfile.aif to sms-received1.cap.
10.) Ensure that ssh is installed on your jailborken iPhone.
11.) Replace one of the sms-received[1-6].caf files in /System/Library/Audio/UISounds with your newly created sms-received[1-6].cap file. I used FileZilla to transfer the file from my Mac to the iPhone, but you can use any sftp/scp client or the command line from Terminal.
12.) Now, on your iPhone, you can find your newly create sound in Settings/Sounds/”New Text Message.” The selection names do not change, but you can select each one to hear the sample to find your custom SMS/MMS text sound.
13.) Remember to switch back to Import Settings in iTunes.

How to repair Dell boot record to access restore partition.

The boot record on a Dell E310 was modified over time as a result of various system updates. I was unable to access the restore partition, when the OS needed to be restored, using Ctrl-F11 at the BIOS boot screen. To restore the boot record so that I could use Ctrl-F11, I created a bootable DOS CD using the fdfullcd.iso from the FreeDOS site (http://www.freedos.org/). Then, I created another CD with the dsrfix.exe (http://www.goodells.net/dellrestore/files/dsrfix.zip) utility on it. I unzipped the dsrfix.zip file and burn the contents of the zip file onto a CD.

From here, I booted the FreeDOS CD. Then, I removed the FreeDOS CD and put in the dsrfix CD. I ran mscdex.exe at this point. However, I do not believe that was necessary. Then, I switched to the E: drive and ran dsrfix. I had an alert on pbr descriptor 3. Next, I ran dsrfix /F. This repaired the record so that Ctrl-F11 worked. Thanks to Dan Goodell (http://www.goodells.net/dellrestore/). According to Dan’s site, his utility has been tested on the following Dell systems: Dimension 1100, 2400, 3000, 3100, 4550, 4600, 4700, 5000, 5100, 5150, 8200, 8300, 8400, 9100, 9150, B110, E310, E510, E520, E521, XPS 400, XPS 410, XPS 720, XPS Gen 4. Inspiron 500m, 510m, 600m, 630m, 640m, 700m, 1150, 1200, 1300, 1501(AMD), 2200, 5100, 5150, 6000, 6400, 8600, 9300, 9400, B120, B130, E1405, E1505, E1705, M710, M1210, XPS, XPS Gen 2, XPS M1710. Vostro 200.

How to add more swap space in linux.

I used this procedure to add swap space to a server, where I not more available partitions, but had space on a previously formated partition.

# mkdir /var/swap

Create container files:
# dd if=/dev/zero of=/var/swap/swapfile1 bs=1024 count=65536
# dd if=/dev/zero of=/var/swap/swapfile2 bs=1024 count=65536
# dd if=/dev/zero of=/var/swap/swapfile3 bs=1024 count=65536
# dd if=/dev/zero of=/var/swap/swapfile4 bs=1024 count=65536

Format as swap:
# mkswap /var/swap/swapfile1
# mkswap /var/swap/swapfile2
# mkswap /var/swap/swapfile3
# mkswap /var/swap/swapfile4

Add them to startup:
# vi /etc/fstab

/var/swap/swapfile1 swap swap defaults 0 0
/var/swap/swapfile2 swap swap defaults 0 0
/var/swap/swapfile3 swap swap defaults 0 0
/var/swap/swapfile4 swap swap defaults 0 0

Enable them:
# swapon -a
Check them:
# swapon -sh

Improve performance of Thunderbird 3 (IMAP).

When I did a new installation of Fedora 13 and configured Thunderbird 3.0.4 for IMAP, I found that the performance was just atrocious. It was downloading all the messages from all my folders.

The release notes for Thunderbird gave me a hint:

IMAP Folder Synchronization

Thunderbird will download IMAP messages by default in the background to allow for faster message loading and better offline operation. This feature can be enabled on an individual folder basis via Folder properties, or for all folders in an account via Account Settings / ‘Synchronize & Storage’.

——————–

I turned this “feature” off for my account. It is in “Account Settings” and then “Synchronization & Storage” for my IMAP account. From here, I unchecked “Keep messages for this account on this computer.” Also, I changed the “Disk Space” setting from “Synchronize all messages locally regardless of age” to “Synchronize the most recent 1 Weeks.” These two settings made a huge improvement to my performance. Yes, I lose offline access, but that does not matter to this desktop computer.

How to verify wbinfo_group.pl via command line.

The following is a good way to verify whether your squid configuration with NTLM authentication is properly set up to utilize Windows Active Directory group memberships:

# echo “username windowsgroup” | /usr/lib/squid/wbinfo_group.pl -d
Debugging mode ON.
Got username windowsgroup from squid
User: –username
Group: –windowsgroup
SID: -S-1-5-21-915438365-207112795-1232828436-3341-
GID: -16777237-
Sending OK to squid
OK

Return top

INFORMATION