Archive for the ‘Documentation’ Category

S.M.A.R.T. status for VMware.

I wanted to try to find out the health of my hard drives on a server running VMware ESXi 5. Not even thinking, I used the smartctl command in one of my linux guests.

# smartctl –all /dev/sda
smartctl 5.43 2012-06-30 r3573 [x86_64-linux-2.6.32-431.17.1.el6.x86_64] (local build)
Copyright (C) 2002-12 by Bruce Allen, http://smartmontools.sourceforge.net

Vendor: VMware
Product: Virtual disk
Revision: 1.0
User Capacity: 107,374,182,400 bytes [107 GB]
Logical block size: 512 bytes
Device type: disk
Local Time is: Mon Aug 18 11:18:29 2014 PDT
Device does not support SMART

Error Counter logging not supported
Device does not support Self Test logging

When I saw the output above, I was hoping for something I could run from the guest to get the information. Unfortunately, it looks like this something that has to be done from the host OS. You need to use the esxcli command to get the information. First, you need to identify the disks:

~ # esxcli storage core device list
t10.ATA_____ST32000542AS________________________________________5XW25D4F
Display Name: Local ATA Disk (t10.ATA_____ST32000542AS________________________________________5XW25D4F)
Has Settable Display Name: true
Size: 1907729
Device Type: Direct-Access
Multipath Plugin: NMP
Devfs Path: /vmfs/devices/disks/t10.ATA_____ST32000542AS________________________________________5XW25D4F
Vendor: ATA
Model: ST32000542AS
Revision: CC34
SCSI Level: 5
Is Pseudo: false
Status: on
Is RDM Capable: false
Is Local: true
Is Removable: false
Is SSD: false
Is Offline: false
Is Perennially Reserved: false
Queue Full Sample Size: 0
Queue Full Threshold: 0
Thin Provisioning Status: unknown
Attached Filters:
VAAI Status: unknown
Other UIDs: vml.01000000002020202020202020202020203558573235443446535433323030
Is Local SAS Device: false
Is Boot USB Device: false

As you can see, this provides a lot interesting information about the drive. However, if you have a lot of drives, it can be more information than you need. I used grep to filtered out the unneeded information:

~ # esxcli storage core device list | egrep “^t10”
t10.ATA_____ST32000542AS________________________________________5XW25D4F
t10.ATA_____WDC_WD20EARX2D00PASB0_________________________WD2DWCAZAK376887
t10.ATA_____WDC_WD20EARS2D00MVWB0_________________________WD2DWMAZA3727224
t10.ATA_____WDC_WD5003ABYX2D18WERA0_______________________WD2DWMAYP2756258

That way, I can identify all the drives in my system in a neat list.

Then, to view the S.M.A.R.T. information:

~ # esxcli storage core device smart get -d t10.ATA_____ST32000542AS________________________________________5XW25D4F
Parameter Value Threshold Worst
—————————- —– ——— —–
Health Status OK N/A N/A
Media Wearout Indicator N/A N/A N/A
Write Error Count N/A N/A N/A
Read Error Count 111 6 99
Power-on Hours 66 0 66
Power Cycle Count 100 20 100
Reallocated Sector Count 100 36 100
Raw Read Error Rate 111 6 99
Drive Temperature 42 0 46
Driver Rated Max Temperature 58 45 54
Write Sectors TOT Count 200 0 200
Read Sectors TOT Count N/A N/A N/A
Initial Bad Block Count 100 99 100

Find IP address of a device connected to a Cisco switch

Cisco 3750:
IOS Version: 12.2(55)SE8

Yes, I know there are some pricey software tools that will do this with a couple clicks. But I don’t have budget for them. So here is a simple way to determine the IP address of a device connected to a particular port on a Cisco switch.

First, determine the MAC address:

show mac address-table

This will output the VLAN, MAC address and the port for all the connected devices. Here is an example:

30 000c.2928.8da7 DYNAMIC Gi1/0/18
30 000e.0c30.e42a DYNAMIC Gi1/0/17
30 0018.1900.19e0 DYNAMIC Gi1/0/17
100 000c.29b0.0b89 DYNAMIC Gi2/0/36
100 0080.a399.90f9 DYNAMIC Gi3/0/7
200 0023.246f.c77a DYNAMIC Gi2/0/42
200 2c44.fd28.d315 DYNAMIC Gi2/0/42
200 7427.ea1b.551d DYNAMIC Gi3/0/42
300 0004.006f.47ee DYNAMIC Gi3/0/47
300 0021.b7ae.3f00 DYNAMIC Gi6/0/45
300 0030.c1ad.995b DYNAMIC Gi3/0/48
300 0060.b05f.b290 DYNAMIC Gi4/0/45
300 00c0.ee19.f178 DYNAMIC Gi2/0/48
300 00c0.ee3a.a3c8 DYNAMIC Gi3/0/43

So, if you know the port you can obviously find the corresponding MAC address. Once you know the MAC address, you can determine the IP address by cross referencing that MAC address to the output from a “show arp” command.

Here is some sample output:

Protocol Address Age (min) Hardware Addr Type Interface
Internet 10.10.10.10 0 000e.0c09.fc6a ARPA Vlan400
Internet 10.251.11.250 – 000a.b8c0.0bc3 ARPA Vlan300
Internet 10.10.10.11 0 0004.23b5.525c ARPA Vlan400
Internet 10.10.10.8 0 000e.0c08.b9d4 ARPA Vlan400
Internet 10.10.10.9 0 000c.2934.423f ARPA Vlan400
Internet 10.10.10.14 4 0007.e924.54cc ARPA Vlan400
Internet 10.10.10.15 0 000e.0c08.f4e4 ARPA Vlan400
Internet 10.10.10.12 2 000e.0c32.350e ARPA Vlan400
Internet 10.10.10.13 0 0007.e924.1c07 ARPA Vlan400
Internet 10.10.10.2 0 aa00.0400.0404 ARPA Vlan400

Tacking on an “include” to filter the output, makes it pretty simple:

#show mac address-table | include Gi3/0/45
300 00c0.eeb1.0b57 DYNAMIC Gi3/0/45
#show arp | include 00c0.eeb1.0b57
Internet 10.251.8.200 2 00c0.eeb1.0b57 ARPA Vlan300

Now, I know that 10.251.8.200 is on switch 3 port 45.

Windows 7 – Change boot wallpaper

Change the OEMBackground registry key from 0 to 1. The location is outlined below:

[HKEY_LOCAL_MACHINE\SOFTWARE\Microsoft\Windows\CurrentVersion\Authentication\LogonUI\Background]
“OEMBackground”=dword:00000001

Navigate to:

C:\Windows\System32\oobe\info\backgrounds

Rename the existing image from backgroundDefault.jpg to something else like backgroundDefault.jpg.orig.

Then, you are going to put the image you want in this directory. The key is making the image you replace it with is 256Kb or less, and is a jpg. Once you have such an image that you want to use, put it in the “C:\Windows\System32\oobe\info\backgrounds” directory and name it backgroundDefault.jpg.

Windows 7 – change default user logon picture.

This is just a matter of knowing where the image is stored and getting on that it correct size to replace it.

The default picture, the orange flower, is stored in:

C:\ProgramData\Microsoft\User Account Pictures\

Rename the original user.bmp to something like user.bmp.orig.

Then, create or resize or find the 128×128 pixel image you want to replace it with and convert it to a bmp if it is not already. When you have the image, simply paste it in the “C:\ProgramData\Microsoft\User Account Pictures\” directory and rename it to user.bmp.

Set default wallpaper for all user in Windows 7

This will set the default wallpaper for all users who login to a Windows 7 machine.

First, login to the machine with an Administrator level account.

Open up regedit.

Load the Default profile ntuser.dat. (see http://jim-zimmerman.com/?p=196)

I loaded the hive using JGZ for the name. Navigate to:

[HKEY_USERS\JGZ\Software\Microsoft\Windows\CurrentVersion\Policies]

Note: If you do not have a System key under Policies, create one now.

[HKEY_USERS\JGZ\Software\Microsoft\Windows\CurrentVersion\Policies\System]

Then, in the System key, add the following two String Values:

“Wallpaper”=”C:\\Windows\\Web\\Wallpaper\\mydirectory\\myimage
“WallpaperStyle”=”4”

Note: I put my wallpaper in a subdirectory I created in the Wallpaper directory.

Unload the Default hive, and reboot.

Activate Windows 8 new install using an Update key

This pertains to a new Windows 8 installation, but you purchased a Windows 8 upgrade license key.

From an administrator level account in your new Windows 8 installation bring up regedit from an administrative level command prompt.

Navigate to

HKEY_LOCAL_MACHINE/Software/Microsoft/Windows/CurrentVersion/Setup/OOBE/

Modify the MediabootInstall key.

If the value is a 1, change it to a 0.

Back to the elevated command prompt, enter

slmgr /rearm

Then, reboot.

shutdown /r /y /t 0

Disable last user logged in on Windows 7

To disable the last user logged in on Windows 7, you need to enable the DontDisplayLastName registry entry. There is a downside to enabling this. Since Windows 7 supports multiple concurrent logins, having this enabled prevents you from easily seeing who else is logged in. Probably, the easiest way to tell who else is logged is by bringing up the Task Manager and clicking on the Users tab.

Windows Registry Editor Version 5.00

[HKEY_LOCAL_MACHINE\SOFTWARE\Microsoft\Windows\CurrentVersion\Policies\System]
“DontDisplayLastUsername”=dword:00000001

How to start Outlook in safe mode.

If you have problematic Outlook plugin installed and want to disable it, you will want to do it from Outlook when it is running in Safe Mode.

A couple ways you can do it are as follows:

1) Hold down the Ctrl key while opening Outlook.

2) Locate the Outlook.exe file and execute it from a Command prompt or Run with a /safe switch.

c:\> outlook.exe /safe

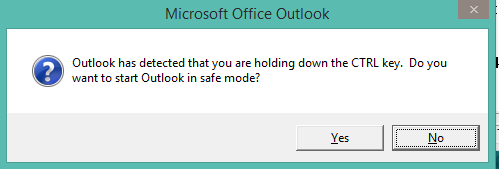
You might get a message like the following:
OutlookSafeMode

Click Yes and Outlook will open up.

Note: In Outlook 2013, I was only prompted to choose the Profile to use.

Windows 2012 R2 network trace

OS: Windows 2012 R2

For years, I used to get upset when I knew that a simple network trace would give me the answer to an issue only to find that netmon or an equivalent was not installed on the server. Well, with the later versions of Windows, the “netsh trace” command is there to help. Netsh is a very powerful command that I continue to turn to for help.

Just a few of the “netsh trace” options:
report: Creates an HTML report file that I found pretty useless. However, this also creates a CAB file that contains potentially a lot of useful information.
scenario: You can choose different scenarios. To determine the list of possible scenarios, you can look at the following registry key:
[HKEY_LOCAL_MACHINE\SYSTEM\CurrentControlSet\Control\NetTrace\Scenarios]

Or you can do:
netsh trace show scenarios

I chose NetConnection, but I just wanted to capture the traffic.
persistent: If yes, the trace will restart when the server is rebooted. Would almost never want that on, which is the default.
maxsize: To specify the maximum size of the trace file. the default is 250MB.
correlation: The will try to group related packets together.
tracefile: The name and location of where you want the file(s) to be saved.

Start a trace:

C:\>netsh trace start scenario=NetConnection capture=yes report=yes persistent=no maxsize=1024 correlation=yes tracefile=trace.etl

Trace configuration:
——————————————————————-
Status: Running
Trace File: trace
Append: Off
Circular: On
Max Size: 1024 MB
Report: On

Stop a trace:

C:\>netsh trace stop
Correlating traces … done
Merging traces … done
Generating data collection and report … done
The trace file and additional troubleshooting information have been compiled as
“C:\trace.cab”.
Tracing session was successfully stopped.

If you open up the etl file using NetMon and see the following messages in the description:

MicrosoftWindowsTCPIP: Windows stub parser: Requires full Common parsers. See the “How Do I Change Parser Set Options(Version 3.3 or before) or Configure Parser Profile (Version 3.4)” help topic for tips on loading these parser sets.

Then, you need to enable to Windows Parser under Parser Profiles in Network Monitor. In version 3.4, it is in the top right corner of the window. In the Options, you can set it to be the default parser profile.

Save iPhone voicemail from an iTunes backup.

OS: MacOS Mavericks
iPhone 5s

Voicemail messages are stored in the backup, and saved as one file per message. Nice. Backups are stored in:

~/Library/Application\ Support/MobileSync/Backup

Within the Backup directory, there directories of backups for all your iDevices. I made it easy on myself by performing a backup just prior to saving the my voicemails.

Launch Terminal.

Go to the backup directory:

$ cd ~/Library/Application\ Support/MobileSync/Backup

List the files/directories and sort by date:

$ ls -trl

The last directory, in my case, was the one with the most recent backup I had just completed.

Make a copy of this directory to mess around with:

$ cp -rp 44e1c7c3d719bd24e3b9dd1aa87eb924c9153ff5 /Users/jgz/TestBackup

Change directories to the where you made your copy:

In my case:

$ cd /Users/jgz/TestBackup

Then, identify the voicemail files using the file command:

$ file * | grep “Adaptive Multi-Rate Codec”

This will list all of the voice mail messages in the backed up.

Rename the files with an .amr file extension, and play them in QuickTime. Once, you find the ones you want to keep, export them as Audio only files (m4a) to keep.

Return top

INFORMATION