Archive for the ‘Documentation’ Category

How to get access to HP Touchpad homebrew applications, patches and kernels.

First, just a few comments about webos. Webos is a good mobile OS. It has/had (depends on how you look at it) the potential to be the best mobile OS out there. The basic operation is much better than any other mobile OS I have experienced, including IOS and Android. It is easily the best web browsing experience I have had on a smaller screen device. Great for a tablet form factor. However, it seems to me that it has fallen behind the other major players. It just feels like it is really close to being great, if it only got the attention it deserves. It needs a number of patches and bug fixes to address issues. It needs a chance to mature more. It should have matured quicker than it has thus far.

Note: This is the procedure I used get Preware installed by connecting my HP Touchpad to MacOS computer running Lion. I suspect that procedure is very similar in Windows, however I bet the novacom drivers installed without needing a workaround as outlined below.

Install Preware:

Connect Touchpad to your computer using the micro USB cable provided with Touchpad. Do NOT choose mount as USB device.
Download and launch WebOS Quick Install, which I downloaded from here:

http://forums.precentral.net/canuck-coding/274461-webos-quick-install-v4-0-a.html

If you get an error installing the novacom drivers, open terminal and enter the following to start the daemon:

sudo /opt/nova/bin/novacomd

Then, WebOS Quick Install should detect your device.
Click on the globe icon to download the list of homebrew applications, etc..
Select and install Preware.
This will put a Preware icon under Downloads on your Touchpad.

Launch Preware to install patches to help improve performance:

I installed the following as recommend by the following post on the PreCentral website:

http://forums.precentral.net/hp-touchpad/287848-my-hp-touchpad-seems-running-so-fast-2.html#post3027858

Make It So
Muffle System Logging
Remove Dropped Packet Logging
Unset CFQ IO Scheduler
Unthrottle Download Manager
Quiet powerd Messages
Faster Card Animations HYPER Version
Increase Touch Sensitivity And Smoothness 10
Max Blocker
Private Browsing

Applying these patches to my 3.0.2 upgraded HP Touchpad helped to make it run much more smoothly. I wish I could say the same for the UberKernel and overclocking to 1.5GHZ, but that is for another day when I make another attempt.

Update: I did make another attempt at overclocking to 1.5GHz. It seems to be working better, but I am not sure that it is as significant any improvement as I have heard others proclaim. Applications do seem to open a little faster. Nonetheless, I am going to leave it for now.

Linux DNS: creating a subdomain.

Here I have chosen to use a separate zone file for my subdomain. This is not the only way to do this, but it is the way I did it. I did this in CentOs 5.x.

One using it own zone file:
vi /var/named/chroot/etc/named.conf

zone “mydomain.com” in {
type master;
file “mydomain.com.zone”;
allow-transfer { xxx.yyy.zzz.aaa ; bbb.ccc.ddd.eee ; };
};

// Begin MyDomain.com Subdomains
zone “subdomain.mydomain.com” in {
type master;
file “subdomain.mydomain.com.zone”;
allow-transfer { xxx.yyy.zzz.aaa ; bbb.ccc.ddd.eee; };
};
// End MyDomain.com Subdomains

vi /var/named/chroot/var/named/subdomain.mydomain.com.zone
$ORIGIN .
$TTL 86400 ; 1 day
subdomain.mydomain.com IN SOA ns1.subdomain.mydomain.com. root.localhost.subdomain.mydomain.com. (
201002224 ; serial
7200 ; refresh (8 hours)
7200 ; retry (2 hours)
604800 ; expire (1 week)
86400 ; minimum (1 day)
)

$ORIGIN subdomain.mydomain.com.
NS ns1.subdomain.mydomain.com.
NS ns2.subdomain.mydomain.com.
IN MX 10 mail1.subdomain.mydomain.com.
IN MX 20 mail2.subdomain.mydomain.com.
IN A xxx.yyy.zzz.aaa
ns1 IN A xxx.yyy.zzz.aaa
ns2 IN A bbb.ccc.ddd.eee
mail1 IN A xxx.yyy.zzz.aaa
mail2 IN A bbb.ccc.ddd.eee
host1 IN A xxx.yyy.zzz.aaa
host2 IN CNAME host1.subdomain.mydomain.com.

Delete a Windows user’s local profile

Right click on Computer and go to Properties.
Click Change Settings .
In the System Properties dialog box, click the Advanced tab.
Under User Profiles , click Settings .
In the User Profiles dialog box, select the profile that you want to delete, click Delete , and then click OK .

Locate and then expand the following registry subkey:

HKEY_LOCAL_MACHINE\SOFTWARE\Microsoft\Windows NT\CurrentVersion\ProfileList

Right-click the SID that you want to remove, and then click Delete .

Log on to the computer and create a new profile.

VMware ESXi and Windows 2008 R2 Cluster in a box

Software: VMware ESXi 4.1 Update 1, Windows 2008 R2.
Cluster Members: VMCLMEM01, VMCLMEM02.
Cluster Name: CL01.

In the vSphere client, you need to create a virutal network to support the cluster heartbeat communication.
Click on your ESXi host, and then the Configuration tab.
Select Networking under Hardware.
Then Add Networking…
Connection Type: Virtual Machine
Create a virtual switch.
Network Label: Private

Create new virtual machine from the vSphere Client:
Options:
Typical
Name: VMCLMEM01
Datastore
Guest Operating System: Windows 2008 R2
Create a Disk:
Disk Size: 20GB
Disk Provisioning: “Support clustering features such as Fault Tolerance.”
Check “Edit the virtual machine settings before completion.”
Add…
Hard Disk (For the cluster quorum disk)
“Create a new virtual disk”
Disk Size: 2GB.
Disk Provisioning:
“Support clustering features such as Fault Tolerance.”
Virtual Device Node:
SCSI (1:0) # You need to chose a different SCSI controller than the one you used for the system disk (My system disk in on SCSI (0:0).
Select the newly added SCSI controller, and select “Virtual”
Add…
Ethernet Adapter
E100
Network label: Private
Connect at power on
Remove the Floppy.
Configure CD to connect to the installation source (I used an ISO stored in one of my datastores.).

Create the second cluster member from the vSphere Client:
Options:
Typical
Name: VMCLMEM02
Datastore
Guest Operating System: Windows 2008 R2
Create a Disk:
Disk Size: 20GB
Disk Provisioning: “Support clustering features such as Fault Tolerance.”
Check “Edit the virtual machine settings before completion.”
Add…
Hard Disk (For the cluster quorum disk)
“Use an existing virtual disk.”
Browse the 2GB virtual disk you created for VMCLMEM01 and select it.
Virtual Device Node:
SCSI (1:0) # You need to chose a different SCSI controller than the one you used for the system disk (My system disk in on SCSI (0:0).
Select the newly added SCSI controller, and select “Virtual”
Add…
Ethernet Adapter
E100
Network label: Private
Connect at power on
Remove the Floppy.
Configure CD to connect to the installation source (I used an ISO stored in one of my datastores. Make sure you check “Connect at power on.”).

Install the Windows Server 2008 R2 Enterprise Full in VMCLMEM01 on the 20GB virtual disk. The 2GB disk will not be used until the cluster software is install and configured. Do not start the VMCLMEM02 installation yet. Complete the installation (network, name, time synchronization screen resolution of at least 1024/x768, and join the domain). Don’t forget to assign an IP address to the second interface (I used 10.1.1.1 and 10.1.1.2, and I renamed the interfaces to Private.). The cluster members need to be joined to a domain. I believe the same domain.

Shutdown down VMCLMEM01, and install Windows Server 2008 R2 Enterprise Full on VMCLMEM02 as you did on VMCLMEM01.

Once Windows is installed and the cluster members joined to the domain, all logins will be using the domain Administrator account.

Once Windows is installed and configured on both future cluster members, shutdown down VMCLMEM02 and boot VMCLMEM01 and login with domain Administrator account.

Bring quorum disk (2GB) online:
Start a command prompt by right mouse clicking on “Command Prompt” and selecting “Run As Administrator.”
DISKPART
SELECT DISK 1 # See my post on DISKPART for more information.
SAN POLICY=ONLINEALL
ATTRIBUTES DISK CLEAR READONLY
ONLINE DISK

Bring up Computer Management, and click on Disk Manager:
Click on Ok to initialize Disk1.
NTFS Format Disk 1, and assign it a drive letter (I chose M.) and label QuorumDisk.
Add the “Failover Clustering” Feature from Server Manager.

Boot the second cluster member, and add the “Failover Clustering” Feature from Server Manager.

Bring up “Failover Cluster Manager”on VMCLMEM01.
Right mouse click on “Failover Cluster Manager” and choose “Create Cluster.”
Add VMCLMEM01.
Add VMCLMEM02.
Run validation test.
Run all tests.
Enter your cluster name (CL01), and IP address for the cluster.

This will get you virtual Windows 2008 R2 cluster running on one ESXi host. Now you can add any supported cluster services and applications. I set up file and print services, as well as IIS which I will document later.

Enable application and daemon core dumps in RHEL6.

To enable core file creation for daemons:

# vi /etc/security/limits.conf
…
#* soft core 0
* soft core unlimited
…

# vi /etc/sysctl.conf
…
kernel.core_pattern = /tmp/core-%e-%s-%u-%g-%p-%t
fs.suid_dumpable = 2
…

# vi /etc/sysconfig/init
…
DAEMON_COREFILE_LIMIT=’unlimited’
…

# sysctl -p

To enable core dumps for xinetd services, I just needed to install the Automatic Bug Report Tool (abrt), and start the service:

# yum install abrt-desktop

# service abrtd start

Some command line commands:
# abrt-cli –list
# abrt-cli –report crash_id

Windows 2008 R2 shared disk offline solution.

Here are the steps I used to bring a shared disk online from within Windows 2008 R2. I was attempting to create a Microsoft Cluster within VMWare ESXi when I ran across this issue. This worked to bring the disk online and I was able to add it to the cluster I created, however I have run across some other VMWare issues preventing me from bring up the other node of the cluster. Nonetheless, here was how I brought the disk online. Apparently, this is how Windows 2008 handles all newly added shared storage.

H:\>DISKPART

Microsoft DiskPart version 6.1.7600
Copyright (C) 1999-2008 Microsoft Corporation.
On computer: VMCL01

DISKPART> LIST DISK

Disk ### Status Size Free Dyn Gpt
——– ————- ——- ——- — —
Disk 0 Online 20 GB 0 B
Disk 1 Offline 10 GB 10 GB

DISKPART> SAN POLICY=ONLINEALL

DiskPart successfully changed the SAN policy for the current operating system.

DISKPART> SELECT DISK 1

Disk 1 is now the selected disk.

DISKPART> ATTRIBUTES DISK
Current Read-only State : Yes
Read-only : Yes
Boot Disk : No
Pagefile Disk : No
Hibernation File Disk : No
Crashdump Disk : No
Clustered Disk : No

DISKPART> ATTRIBUTES DISK CLEAR READONLY

Disk attributes cleared successfully.

DISKPART> ONLINE DISK

DiskPart successfully onlined the selected disk.

DISKPART> ATTRIBUTES DISK
Current Read-only State : No
Read-only : No
Boot Disk : No
Pagefile Disk : No
Hibernation File Disk : No
Crashdump Disk : No
Clustered Disk : Yes

DISKPART> LIST DISK

Disk ### Status Size Free Dyn Gpt
——– ————- ——- ——- — —
Disk 0 Online 20 GB 0 B
* Disk 1 Online 10 GB 10 GB

linux DNS and Office365

I have spending quite a bit of time recently playing with Microsoft’s Office365. I have been interested in how to manage the DNS records in my linux DNS to support Office365. For example, I wanted to access my Office365 email, Lync server, and Sharepoint via my specified hostnames as defined in my DNS. Email was simple enough. Setting up these records got the email to my domain directed properly, and I was able to use auto discover to configure my iPhone, android device and desktop computer email clients easily. I have listed the key records below:

mydomain.com. 360 IN TXT “v=spf1 include:outlook.com ~all”

$ORIGIN mydomain.com.
@ IN MX 0 mydomain-com.mail.eo.outlook.com.
ms49911282 IN CNAME ps.microsoftonline.com.
autodiscover IN CNAME autodiscover.outlook.com.

Lync presented a bit more of challenge. And I found several sources on the Internet of people trying to get the records set up properly, but all of them seemed to have something wrong. Ultimately, these are the records that I had to add to access my Office365 Lync server. The lesson learned from setting these records should help records that Active Directory requires that I have never had occasion to look at before.

_sip._tls IN SRV 100 1 443 sipdir.online.lync.com.
_sipfederationtls._tcp IN SRV 100 1 5061 sipfed.online.lync.com.

Sharepoint is giving me a bit of an issue that I have been trying to address with Microsoft, but they have been less than responsive. I hope this is not how small businesses can expect to be treated by Microsoft when this product goes live. It would certainly cause me to reconsider what I otherwise think is a pretty good product. Anyway, I believe I have the records defined properly, but I cannot verify them because I am unable to enable Sharepoint Online in my domain properties or intent ( I have added a screen shot of the issue at the bottom of this post.).

My company records (Sharepoint site):
sharepoint IN CNAME mycompany.sharepoint.com.
sp IN CNAME mycompany.sharepoint.com.

My public records (public Sharepoint site):
sharepoint-pub IN CNAME ProdNet11.SharePointOnline.com.
sp-pub IN CNAME ProdNet11.SharePointOnline.com.

I will update this when, I finally hear something from Microsoft.

Unable to enable Sharepoint

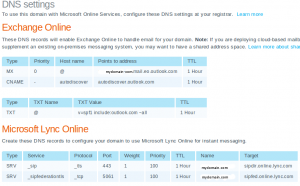
Here are the DNS settings as documented in Office365 for mydomain.com. This is the information Microsoft provides to help you add the appropriate records:

Office365 DNS Settings

Update 1/10/2012:
While trying out the Lync client on my iPhone, I discovered that I was missing another DNS record to support Lync server auto-discovery. I just needed to add the following record to my DNS:

lyncdiscover IN CNAME webdir.online.lync.com.

This allowed iPhone Lync clients to use the auto detect server feature. I suspect that this was needed for other clients too, since I had to set it up manually before. I am going to try this on MacOS later to see if that works better too.

Enable ftps in vsftpd.

To enable ftps on my CentOS 5 server I first needed to create a self-signed certificate:

# cd /etc/pki/tls/certs
# make vsftpd.pem
umask 77 ; \
PEM1=`/bin/mktemp /tmp/openssl.XXXXXX` ; \
PEM2=`/bin/mktemp /tmp/openssl.XXXXXX` ; \
/usr/bin/openssl req -utf8 -newkey rsa:1024 -keyout $PEM1 -nodes -x509 -days 365 -out $PEM2 -set_serial 0 ; \
cat $PEM1 > vsftpd.pem ; \
echo “” >> vsftpd.pem ; \
cat $PEM2 >> vsftpd.pem ; \
rm -f $PEM1 $PEM2
Generating a 1024 bit RSA private key
……….++++++
………………..++++++
writing new private key to ‘/tmp/openssl.R27560’
—–
You are about to be asked to enter information that will be incorporated
into your certificate request.
What you are about to enter is what is called a Distinguished Name or a DN.
There are quite a few fields but you can leave some blank
For some fields there will be a default value,
If you enter ‘.’, the field will be left blank.
—–
Country Name (2 letter code) [GB]:Country
State or Province Name (full name) [Berkshire]:State
Locality Name (eg, city) [Newbury]:City
Organization Name (eg, company) [My Company Ltd]:Company
Organizational Unit Name (eg, section) []:Department
Common Name (eg, your name or your server’s hostname) []:Servername
Email Address []:Emailaddress

Copy the newly created certificate to /etc/vsftpd:

# cp -p vsftpd.pem /etc/vsftpd/

Add the following to the vsftpd.conf file:

# vi /etc/vsftpd/vsftpd.conf

ssl_enable=YES
rsa_cert_file=/etc/vsftpd/vsftpd.pem

Note: As is above, this will not allow non-anoymous users to use plain ftp. They will have to use ftps. To change this behavior, add the following to your vsftpd.conf:

force_local_data_ssl=NO

Then, restart/start vsftpd:

service vsftpd restart

Note: This worked fine from WinSCP and SmartFTP, but Filezilla gives me the following:
Error: GnuTLS error -12: A TLS fatal alert has been received.
Error: Could not connect to server

Mounting / as writeable from single user mode.

Say you happened remove a disk from your RHEL/CentOS/Fedora system and left the entry to mount a partition in the fstab and rebooted. Well, you end up at a prompt for your root password and dropped into single user mode to resolve the problem before the system can boot up. I used to be able to just mount the root partition writeable by using any number of commands including “mount /” or “mount -rw /”. However, somewhere along the line that changed and those commands would not mount the filesystem as writeable. To workaround the issue, I previously used a distribution rescue disk or booted the distribution disk into rescue mode. Then, I would edit the fstab from rescue mode:

I usually chrooted the system disk:

chroot /mnt/sysimage

And then to make the changes:

vi /etc/fstab

I knew there had to be a better, more efficient way to do this, but just never took the time to figure out what is was, until now.

If you find yourself in similar situation, and need to edit a file or make some other changes to the filesystem from single user mode, this will do the trick:

mount -w -o remount /

Then, you can edit the fstab that you forgot to before carelessly removing that hard drive.

Windows 7 – Desktop icon resize

Picked up a not so obvious way to modify the Desktop icon size on a Windows 7 machine.

Hold down the control key, and use the wheel on the mouse to change them to the desired size. I am not really sure how you would do this on a laptop, but my guess is that you would drag your finger up or down the trackpad while holding down the control key.

Return top

INFORMATION