Configure Windows 2012 server to use NTP server.

I used the following procedure to configure my Windows 2012 server to use NTP running on my linux server.

Configure the Window Time service to use the NTP server:

PS > w32tm /config /manualpeerlist:NameOrIPAddress /syncfromflags:MANUAL

Example:

PS > w32tm /config /manualpeerlist:192.168.0.1 /syncfromflags:MANUAL

Stop the Windows Time service:

PS > Stop-Service W32Time

Start the Windows Time service:

PS > Start-Service W32Time

Query the Windows Time service:

PS > w32tm /query /status

How to use minicom to access Cisco equipment console

This is another one of those things that I do not do very often. And when it comes up, I have re-invent the wheel. No more. I will have here.

This was done from a CentOS 6.x machine connected via a Cisco console cable to a 35xx switch. This configuration has worked for any Cisco equipment I have worked with as well.

If minicom is not installed:

# yum install minicom

Setup minicom.

# minicom -s

Configure the serial port by selecting “Serial port setup” from the menu.

Select the serial port using A:
A (ttyS0)

Configure the port connection by selecting E:
E
C (9600)
V (Bits)
L (Parity)
W (Stopbits)

9600 8N1

Toggle the hardware flow control:
Hardware Flow Control (off):
F

This will save the configuration as the default configuration:

Save setup as dfl

Ensure that user accounts that need to access the console are added to the dialout group.

# vigr

dialout:x:18:jim

Verify your terminal emulation. Mine was set to xterm, and none of the menuing worked. Obviously, this would need to be done in the user environment.

# export TERM=vt100

Another useful setting is the toggle to enable logging. This is very useful, especially when messing a router or switch configuration.

From the menu (CTRL-A Z), enable capture using L.

Recover a Cisco switch password

Used this procedure to get back into a Cisco 35xx switch that I forgot the enable password.

Unplug switch.
Push and hold the mode button on the front of the switch, and plug the switch in.

At the switch prompt, enter flash_init

switch: flash_init
Initializing Flash…
flashfs[0]: 456 files, 6 directories
flashfs[0]: 0 orphaned files, 0 orphaned directories
flashfs[0]: Total bytes: 32514048
flashfs[0]: Bytes used: 9057280
flashfs[0]: Bytes available: 23456768
flashfs[0]: flashfs fsck took 13 seconds.
…done Initializing Flash.
Boot Sector Filesystem (bs) installed, fsid: 3
Setting console baud rate to 9600…

Once back at the switch prompt, enter load_helper.

switch: load_helper

Temporarily, rename the current config.

switch: rename flash:config.text flash:config.backup

switch: boot

Would you like to terminate autoinstall? [yes]: yes

— System Configuration Dialog —

Would you like to enter the initial configuration dialog? [yes/no]: no

Enable with no pasword:

Switch>enable
Switch#

Rename the config renamed earlier:

Switch#rename flash:config.backup flash:config.text
Destination filename [config.text]?

Now, copy it to be your running config:

Switch#copy flash:config.text system:running-config
Destination filename [running-config]?

Fix your mistake:

Zswitch(config)#no enable secret
Zswitch(config)#enable password mysupersecretpassword

Copy the updated running config to be the startup:

Zswitch(config)#exit
Zswitch#copy running-config startup-config
Destination filename [startup-config]?

I reloaded the switch to verify I could get in now.

Zswitch#reload
Proceed with reload? [confirm]

Proxy web traffic through another server using ssh.

Totally swiped this from a Linux Journal podcast, but it was so good I wanted to write it down for future reference:

# ssh -N -D someportnumber username@somesshserver

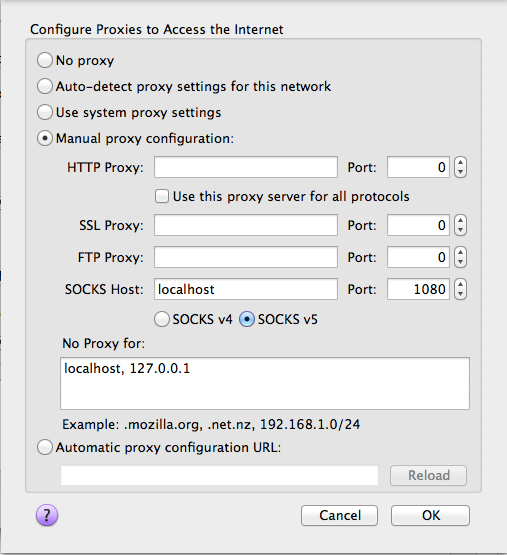
Then, enter your password and configure your browser to use SOCKS host version 4 or 5 with localhost and the port you used.

For example:

# ssh -N -D 1080 jim@11.22.33.44

Browser configuration:

ProxySettings

Convert UTF-16 file to UTF-8

A lot of times, I find myself creating output files in Windows that I want to use linux to parse because I am more comfortable scripting in linux than in Windows. Most times I the output UTF-16 encoded. You can tell by using the file command. I used this to convert a file generated in Windows 2003 server, so that I could work with it in CentOS 6.x.

$ file myfilename.txt
myfilename.txt: Little-endian UTF-16 Unicode text, with CRLF line terminators

Then, to convert the file:

$ iconv -f utf-16 -t utf-8 myfilename.txt > mynewfilename.txt

Delete or mark as read all Google Voice messages.

What led me down this path? Well, for some reason the geniuses at Google decided to make it very difficult to delete or select all of your messages. Using a browser, you are only able to select 10 at a time. On a mobile device, using an application, it is even more painful. I did some digging around and found pygooglevoice. It allows you to utilize the Google Voice API via Python. Most these will only operate on 10 messages at a time, however that is easily rectified with multiple calls or some better python programming than I know.

You need to have python installed to execute these scripts. I used these on a CentOS 6 system.

Software: http://code.google.com/p/pygooglevoice/

Installation/Configuration:

# yum install python python-setuptools
# easy_install simplejson
# easy_install -U pygooglevoice
# cd /usr/lib/python2.6/site-packages/pygooglevoice-0.5-py2.6.egg/googlevoice
# vi settings.py

# JGZ – Updated login URL since default did not work
#LOGIN = ‘https://www.google.com/accounts/ServiceLoginAuth?service=grandcentral’
LOGIN = ‘https://accounts.google.com/ServiceLogin?service=grandcentral’

Script samples to use the module:

Delete all read messages from your inbox:

from googlevoice import Voice

voice = Voice()
voice.login(‘GOOGLEVOICELOGIN’, ‘PASSWORD’)

for message in voice.inbox().messages:
if message.isRead:
message.delete()

Delete all read messages from your trash:

from googlevoice import Voice

voice = Voice()
voice.login(‘GOOGLEVOICELOGIN’, ‘PASSWORD’)

for message in voice.trash().messages:
if message.isRead:
message.delete()

Mark all unread messages as read:

from googlevoice import Voice,util

voice = Voice()
voice.login(‘GOOGLEVOICELOGIN’, ‘PASSWORD’)

while True :
folder = voice.search(‘is:unread’)
if folder.totalSize <= 0 : break util.print_(folder.totalSize) for message in folder.messages: util.print_(message) message.delete(1)

Script sample usage:

# python gvscriptname

Transferring Flexible Single Master Operations (FSMO) roles

Since I don’t have to do this very often, but always seem to forget how to transfer the Schema Master and Domain Naming Master, I decided to write it down, when it came up again as I transferred all the roles to my Windows 2012 server.

The following three FSMO roles can be migrated from Active Directory Users and Computers. Right mouse click on the domain and select Operations Masters. There is one tab for each of the three FSMO roles:

PDC
RID Pool Manager
Infrastructure Master

The following FSMO role can be transfered from Active Directory Domains and Trusts. Right mouse click on Active Directory Domains and Trusts, and select Operations Master.:

Domain Naming Master

For the Schema Master FSMO role, you first need to register a dll by executing the following command (Note: This only needs to be done once from an elevated command prompt.):

c:\> regsvr32 schmmgmt.dll

Then, you can add the Active Directory Schema Snap-In to a Microsoft Management Console (MMC). With the Snap-In added, ensure that the targeted domain controller is the one that you want to transfer the Schema Master role to. To change it, right mouse click on Active Directory Schema, under Console Root, and select Change Active Directory Domain Controller.. to select the domain controler you want to transfer the role to. Once that is done, right mouse click on Active Directory Schema, and select Operations Master to change the role.

If you do not have a different domain controller targeted, you will get the following message:

The current Active Directory Domain Controller is the Operations Master. To transfer the Operations Master to a different DC, you need to target Active Directory Schema to that DC.

And when you switch the target domain controller, you get the following, which is okay for what we want to do.:

Active Directory Schema snap-in is not connected to the schema operations master. You will not be able to permform any changes. Schema modification can only be made on the schema FSMO holder.
Custom email headers in sendmail and postfix.

Sendmail:

# cd /etc/mail
# vi /submit.mc

LOCAL_CONFIG
HX-MyCustomHeader: MyCustomHeaderValue

# m4 submit.mc > submit.cf
# service sendmail restart

Postfix:

# cd /etc/postfix

Note: In the master.cf, only the -o (options) line was added.

# vi master.cf

smtp unix – – n – – smtp
-o smtp_header_checks=regexp:/etc/postfix/mycustomheaders

Create a file to store your custom headers.

# vi mycustomheaders
/^Subject:.*/ PREPEND X-MyCustomHeader: MyCustomHeaderValue

# service postfix restart

Using fail2ban to block/throttle SASL authentication failures

OS: CentOS6
Repository: EPEL

I had gone back and forth on how to handle SMTP Authentication requests. Would I allow it? How would I allow it? I started off, only allowing a few subnets that I knew I would need (T-Mobile, AT&T, etc). I quickly found this to be a management nightmare, so I opened access and configured all my email clients to use SSL to encrypt the traffic. This worked great except for when others found that I had the SMTP Auth enabled and open. I started getting traffic, once in a while, just banging away trying to find an account and password to use to spam from my servers. I finally got fed up, and decided to look into a way to mitigate this behavior. It became apparent to me pretty quickly that fail2ban would do exactly what I was looking for. Basically, fail2ban looks for certain strings in a log file and adds an iptables entry to a special fail2ban chain to block the IP address for a period of time. What I like about this is that I don’t have maintain a large iptables table to block unwanted subnets. Fail2ban will watch that for me. Note: my configuration blocks both port 25 and 465 to cover both port where SMTP Authentication can occur.

Here is what I did to help with my unauthorized SASL attempts:

I installed fail2ban from the EPEL repository that I had installed but not enabled. The required dependencies are listed as well.

# yum –enablerepo=epel install fail2ban

Dependency Installed:
gamin-python.x86_64 0:0.1.10-9.el6
python-inotify.noarch 0:0.9.1-1.el6
shorewall.noarch 0:4.5.4-1.el6
shorewall-core.noarch 0:4.5.4-1.el6
tcp_wrappers.x86_64 0:7.6-57.el6

# cd /etc/fail2ban/
# cp -rp jail.conf jail.conf.orig

I disabled ssh monitoring, since I do not allow that anyway, so it was not needed.

# vi jail.conf

[ssh-iptables]

# JGZ 11/20/2012
#enabled = true
enabled = false

# JGZ 11/19/2012 – enable SASL monitoring
#enabled = false
enabled = true
filter = sasl
backend = polling
# JGZ 11/19/2012
#action = iptables[name=sasl, port=smtp, protocol=tcp]
action = iptables-multiport[name=SASL, port=”smtp,465″]
sendmail-whois[name=sasl, dest=emailaddress]
# sendmail-whois[name=sasl, dest=you@example.com]
# JGZ 11/19/2012 – configure the correct log file name.
#logpath = /var/log/mail.log
logpath = /var/log/maillog

# cd /etc/fail2ban/filter.d/
# cp -p sasl.conf sasl.conf.orig

# vi sasl.conf

# JGZ 11/19/2012 – To support my postfix output
#failregex = (?i): warning: [-._\w]+\[\]: SASL (?:LOGIN|PLAIN|(?:CRAM|DIGEST)-MD5) authentication failed(: [A-Za-z0-9+/]*={0,2})?$
failregex = .*postfix\/smtpd.*warning: .*\[\]:.*SASL .*authentication failure

# service fail2ban start
# chkconfig fail2ban on

With this configuration, after three authentication failures the IP address will be blocked for 5 minutes. All port access will blocked for the address. In addition, an email message will be sent to email address configured in the jail.conf file. Log output is managed via syslog and sent to the /var/log/messages file.

Update:
While installing this in CentOS 7, I discovered some new things.

In jail.local to ban forever:

bantime = -1

# fail2ban-client set jailname unbanip ipaddress

Example:

# fail2ban-client set sshd unbanip 123.123.123.123

Fail2ban has a tool that will allow you to test your regex filters:

# fail2ban-regex /path/to/logfile “someregexstuff”

Solution to being unable to add a new datastore (disk) in VMware ESXi.

I attempted to add a disk to a VMware ESXi 5.0. The system recognized the drive, but would not allow me to add it as a datastore. The disk had data on it, but I did not care and just wanted to format it to add it my datastores. Conveniently, I actually was able to use fdisk much that same way I would in linux to delete all the partitions. I found this much easier than some of the other solutions I found.

Note: I removed some of the “_” in the disk names to preserve the format.

To list the disks installed:

~ # fdisk -l

Disk /dev/disks/t10.ATA_____WDC_WD1600AAJS2D60Z0A0_…_WD2DWCAV3C053389: 160.0 GB, 160041885696 bytes
255 heads, 63 sectors/track, 19457 cylinders
Units = cylinders of 16065 * 512 = 8225280 bytes

Device Boot Start End Blocks Id System
/dev/disks/t10.ATA_____WDC_WD1600AAJS2D60Z0A0_…_WD2DWCAV3C053389p1 * 1 16072 129090560 7 HPFS/NTFS
/dev/disks/t10.ATA_____WDC_WD1600AAJS2D60Z0A0_…_WD2DWCAV3C053389p2 19072 19456 3087360 7 HPFS/NTFS
/dev/disks/t10.ATA_____WDC_WD1600AAJS2D60Z0A0_…_WD2DWCAV3C053389p3 16072 19072 24100864+ f Win95 Ext’d (LBA)
/dev/disks/t10.ATA_____WDC_WD1600AAJS2D60Z0A0_…_WD2DWCAV3C053389p5 16072 17325 10066944 b Win95 FAT32
/dev/disks/t10.ATA_____WDC_WD1600AAJS2D60Z0A0_…_WD2DWCAV3C053389p6 17325 18616 10371072 b Win95 FAT32

Partition table entries are not in disk order

Disk /dev/disks/t10.ATA_____WDC_WD2502ABYS2D18B7A0_…_WD2DWMAT16698967: 250.0 GB, 250000000000 bytes
64 heads, 32 sectors/track, 238418 cylinders
Units = cylinders of 2048 * 512 = 1048576 bytes

Device Boot Start End Blocks Id System
/dev/disks/t10.ATA_____WDC_WD2502ABYS2D18B7A0_…_WD2DWMAT16698967p1 5 900 917504 5 Extended
/dev/disks/t10.ATA_____WDC_WD2502ABYS2D18B7A0_…_WD2DWMAT16698967p2 901 4995 4193280 6 FAT16
/dev/disks/t10.ATA_____WDC_WD2502ABYS2D18B7A0_…_WD2DWMAT16698967p3 4996 238419 239025745 fb VMFS
/dev/disks/t10.ATA_____WDC_WD2502ABYS2D18B7A0_…_WD2DWMAT16698967p4 * 1 4 4080 4 FAT16 <32M /dev/disks/t10.ATA_____WDC_WD2502ABYS2D18B7A0_..._WD2DWMAT16698967p5 5 254 255984 6 FAT16 /dev/disks/t10.ATA_____WDC_WD2502ABYS2D18B7A0_..._WD2DWMAT16698967p6 255 504 255984 6 FAT16 /dev/disks/t10.ATA_____WDC_WD2502ABYS2D18B7A0_..._WD2DWMAT16698967p7 505 614 112624 fc VMKcore /dev/disks/t10.ATA_____WDC_WD2502ABYS2D18B7A0_..._WD2DWMAT16698967p8 615 900 292848 6 FAT16 Partition table entries are not in disk order

To make changes to a disk select the correct that you previously listed. I put quotes around the name. I do not know if you need to do that.:

~ # fdisk /dev/disks/”t10.ATA_____WDC_WD1600AAJS2D60Z0A0_…_WD2DWCAV3C053389″

To display the current disk partitions I am trying to add:

The number of cylinders for this disk is set to 19457.
There is nothing wrong with that, but this is larger than 1024,
and could in certain setups cause problems with:
1) software that runs at boot time (e.g., old versions of LILO)
2) booting and partitioning software from other OSs
(e.g., DOS FDISK, OS/2 FDISK)

Command (m for help): p

Disk /dev/disks/t10.ATA_____WDC_WD1600AAJS2D60Z0A0_…_WD2DWCAV3C053389: 160.0 GB, 160041885696 bytes
255 heads, 63 sectors/track, 19457 cylinders
Units = cylinders of 16065 * 512 = 8225280 bytes

Device Boot Start End Blocks Id System
/dev/disks/t10.ATA_____WDC_WD1600AAJS2D60Z0A0_…_WD2DWCAV3C053389p1 * 1 16072 129090560 7 HPFS/NTFS
/dev/disks/t10.ATA_____WDC_WD1600AAJS2D60Z0A0_…_WD2DWCAV3C053389p2 19072 19456 3087360 7 HPFS/NTFS
/dev/disks/t10.ATA_____WDC_WD1600AAJS2D60Z0A0_…_WD2DWCAV3C053389p3 16072 19072 24100864+ f Win95 Ext’d (LBA)
/dev/disks/t10.ATA_____WDC_WD1600AAJS2D60Z0A0_…_WD2DWCAV3C053389p5 16072 17325 10066944 b Win95 FAT32
/dev/disks/t10.ATA_____WDC_WD1600AAJS2D60Z0A0_…_WD2DWCAV3C053389p6 17325 18616 10371072 b Win95 FAT32

Partition table entries are not in disk order

Delete the primary partitions:

Command (m for help): d
Partition number (1-6): 1

Command (m for help): d
Partition number (1-6): 2

Command (m for help): d
Partition number (1-6): 3

List to verify the partitions are deleted:

Command (m for help): p

Disk /dev/disks/t10.ATA_____WDC_WD1600AAJS2D60Z0A0_…_WD2DWCAV3C053389: 160.0 GB, 160041885696 bytes
255 heads, 63 sectors/track, 19457 cylinders
Units = cylinders of 16065 * 512 = 8225280 bytes

Device Boot Start End Blocks Id System

Create one large partition on the drive. This probably did not need to be done.:

Command (m for help): n
Command action
e extended
p primary partition (1-4)
p
Partition number (1-4): 1
First cylinder (1-19457, default 1): Using default value 1
Last cylinder or +size or +sizeM or +sizeK (1-19457, default 19457): Using default value 19457

Write or save the new configuration. This is the point of no return.:

Command (m for help): w
The partition table has been altered!

Calling ioctl() to re-read partition table

List the saved partition scheme.:

~ # fdisk -l /dev/disks/”t10.ATA_____WDC_WD1600AAJS2D60Z0A0_…_WD2DWCAV3C053389″

Disk /dev/disks/t10.ATA_____WDC_WD1600AAJS2D60Z0A0_…_WD2DWCAV3C053389: 160.0 GB, 160041885696 bytes
255 heads, 63 sectors/track, 19457 cylinders
Units = cylinders of 16065 * 512 = 8225280 bytes

Device Boot Start End Blocks Id System
/dev/disks/t10.ATA_____WDC_WD1600AAJS2D60Z0A0_…_WD2DWCAV3C053389p1 1 19457 156288321 83 Linux

~ #

Return top

INFORMATION